


How to do basic installation in RoboUP APP?
RoboUP - 2024/01/03
The basic installation guide will pop up when add a device in the APP.
Step 1: Unpacking
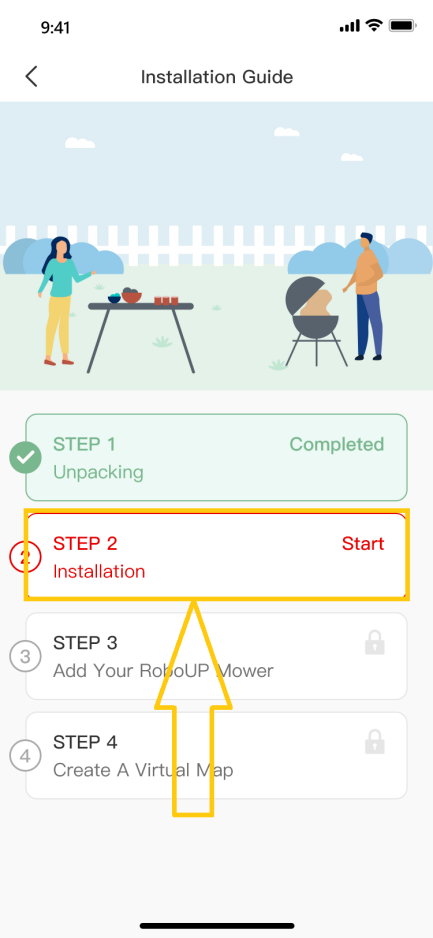
1) Click the [Add device] on the home page to enter [Installation Guide].
2) Tap the [Step 1: Unpacking] to enter the unpacking page to check if any parts are missing. If any parts are missing, please contact the RoboUP service team: service@iroboup.com; if nothing is missing, you can click the [Next Step].

Step 2: Installation
Click [Step 2: Installation] to install the charging station and RTK base station according to the step prompts and animations.
1) Find a suitable location: It is required to be flat without obstacles within 2m of the charging station, and it should be with good Wi-Fi coverage. After the operation is completed, return to the APP and check the ⚪ at the bottom, and then click [Next step].

2) Power on the charging station: Take out the power extension cord (Please note there are 2 extension cords, one is for the charging station and another is for the RTK base station) and power adapter, connect one end of the extension cord to the power adapter, and the other end to the charging station, then plug the power adapter into the socket to power on the charging station. After the operation is completed, return to the APP and check the ⚪ at the bottom, and then click [Next step].

3) Turn on the mower: Long press the power button on the mower to power it on, then put the mower into the charging station. After the operation is completed, return to the APP and check the ⚪ at the bottom, and then click [Next step].

4) Connecting to Satellite: In order to obtain more satellite signals, please wait for 3 minutes to check if the signal indicator of the RTK base station turns solid blue. After the operation is completed, return to the APP and check the ⚪ at the bottom, and then click [Next step] to enter the next step.
If the signal indicator of the RTK base station cannot turn blue for a long time, detach the RTK base station from the charging station and install it in another proper location. For the detailed steps, please click and view [Install RTK Station Separately].


5) Fix the charging station: Use a wrench and fixing nails to fix the charging station on the ground. After the operation is completed, return to the APP and check the ⚪ at the bottom, and then click [Done] to return to [Installation Guide] page.

Step 3: Add Your RoboUP Mower
There are two methods to connect your RoboUP mower on the APP: Bluetooth pairing and Wi-Fi pairing. Bluetooth pairing is a quick connection, while Wi-Fi pairing will support more functions, like factory default and OTA firmware upgrade. Here is the introduction of the Bluetooth pairing, for the Wi-Fi pairing, please refer to the tutorial on Wi-Fi connection.
1) Click [Step 3: Add your RoboUP Mower] to enter the Bluetooth page. If the device is found, click [Connect]; if the device cannot be found, click [Why can't I find my RoboUP mower?] to troubleshoot.


2) Enter the PIN code of the RoboUP mower (the default is 0000), and click [Confirm] to connect to the Bluetooth of the mower.

3) After the connection is successful, click [Done] to return to the [Installation Guide] page.

Map
Create the main boundary
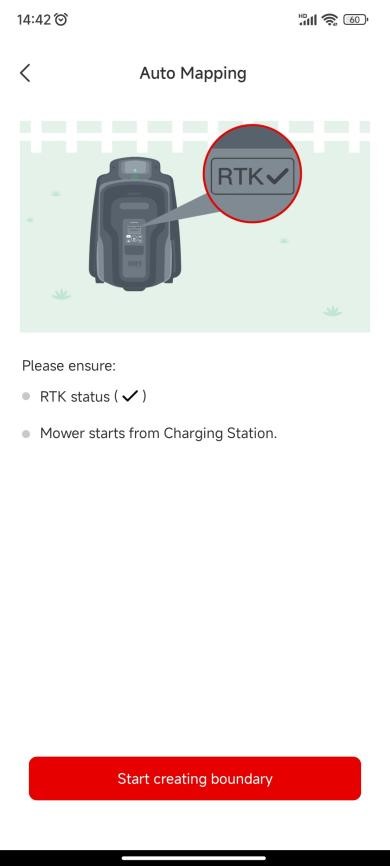
1) Click [Step 4: Create a virtual map] to enter the mapping page, and check if the RTK icon on the UI is [√]: if yes, please check the ⚪ at the bottom, and then click [Next step].


2) Build the main boundary (that is, the map where the charging station is located): click [Create Zone 1], and choose the method of mapping according to the garden environment: Auto mapping or Manual mapping.

① Auto mapping: If the garden is with physical borders, like fences, click [Auto mapping] to enter the next page, and click [Start create boundary], then the mower will do calibration automatically. After the calibrating is finished, it will drive out of the charging station and automatically build a boundary along the edge. After the mower is nearby the charging station, click [Save] on the pop-up window prompts to save the boundary.


② Manual mapping: If the garden is without physical borders, like fences, click [Manual mapping] to enter the next page, install the ruler if needed, and check ⚪ at the bottom, then click [Start create boundary] to enter the manual map creation page. After the mower finishes the calibration, slide the controller on the two sides to manually build a boundary along the edge. After the mower is nearby the charging station, click [Complete] and [Save] on the pop-up window prompts to save the boundary.
Note: Please follow the mower with 3 meters during the process for a stable connection and smooth mapping.


Create a secondary boundary or more boundaries
If there are more than 2 areas or gardens, click [Yes] to continue to create more boundaries. On the page, slide the controller to remote control the mower to arrive at the start point, then click [Yes, the mower has arrived] to the next page. Refer to the Create the main boundary to select the proper method to do the mapping.


Map erasing
Note: At present only supports manual map building, modify the map, that is, there is a section of the path that the mower goes wrong and wants to modify, you could use this function to return to the starting point that needs to be modified.
1) On the manual mapping screen page, click the [Eraser] icon in the upper right corner to enter the map modification page.


2) After driving to the starting point of the path to be modified by the remote control mower, click [Done] to erase this part of the path and continue to build the map again.


Create passages
After the secondary boundary has been created, please click the [Yes] on the pop-up prompts [Please Create a Passage to Connect the Two Zones] to build a passage to link the two boundaries if there is any proper physical passage for the mower to pass by.

1) Make sure the length of the physical passage is between 0.5-20 meters, then click [Next] to enter the landscape page. Before tapping [Start creating passage], slide the controller to control the mower to move to the start point of the passage.


2) Click [Start creating passage], and slide the controller again to control the mower to cross the physical passage to link the two boundaries on the map. After that, tap [Complete] to save the passage.

Finish the mapping
If there are any objects that need to be protected from the mower, click [No-go Zone] to create no-go zones. After all boundaries, passages, and no-go zones have been created, click [Save] to finish the mapping. On the next page, it shows the recommended mowing time, you can click [Schedule Mowing] to set the schedule.


After that, the APP will lead to the last step of introducing how to operate the buttons on the mower, including powering it on, starting mowing, re-charging, and putting PIN code. Make sure you are familiar with the operation, click [Start to use], then you can operate on the APP or on the mower.


0
How do I register and log in to the RoboUP App? How to connect the mower via Bluetooth? How can I connect the mower's Bluetooth on different phones?

